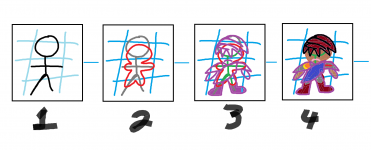
Story come before drawings. If I'm in the moods, I just doodle without restraints as long I got a pen and board or paper. Hands will do if nothing there. When drawing, do not let your Creative Perfectionist instincts control you. Follow your drawing flow else you lose it and go crazy
Hand-drawn Manual for Character
1. Plot out the details, list the character traits - appearance and personality
2. Draw / sketch chibi characters between binder lines for references by your feels
3. Prep your equipment
- 3+ clear protector sheet (more transparent, the better; coloring don't matter)
- 3 Whiteboard markers Expose, black (thinner pen tip, the better = less marker ink waste)
- 1 Whiteboard eraser, 1 paper towel wet, 1 paper towel dry; if dishrag (must be washable)
- 5+ paper reference outlines (PRO) - Skeleton, Shape, Back Body, Details, Face / Head
- 1 electronic device for information and reference researches
- Basic colored pencils or crayons for finishing touches
- YouTube Music / radio music
Don't have PRO? Then I draw it.
- Information research by search engines via Images for styles / types / reference images
- Print a copy and trace or trace from screen onto paper
- Trace the outlines and necessary line measurements or features onto protector sheet
- Protect the reference drawing by pocketing it inside another protector sheet
- Make a print out copy of double-protected sheet (DPS) for keep and reuse
- Slip your new copy (PRO) inside a separate protector sheet (2nd PS)
- Take out DPS and place it under 2nd PS
- Draw your concept with your whiteboard marker on 2rd PS
- Rinse and repeat Steps 1-8 for 5 separate PROs if needed
Hand-drawn Manual for Character continued. . . .
4. Choose either PRO of Face / Head, Body Shape, or Skeleton to start from
5. Pocket the PRO inside separate Protector Sheet (PS)
6. Draw with marker on the 1st Layer PS
7. Check with desired trait list, then make copy of the drawn PS
8. Take copy of new PRO and pocket it in separate PS
9. Draw the ideal designs on 2nd Layer PS
** If Skeleton is selected, then Steps 5-9 rinse and repeat until product is completed
10. Color in the drawing with most preferably basic color pencils, or crayons; NO Paints allowed
11. Like? Make Color Copy for keep. Scan and upload to drive or device's storage.
Hand-drawn Manual for Scenery or Symbols or Items
For Symbols
Dot Grids of 9+
Line Connect
Sketch curves and arches
Draw whatever you choose from reference image online and combine your idea
For Item or Scenery
Stick Sketch on Binder papers with blue lines as guidelines
Trace, draw, or use online images as references on 1st Layer PS
Pocket 1st Layer PS under or inside 2nd Layer PS
Make copy or pocket 2nd Layer PS in another PS if allowed
Add your fine details, then verify with traits
Rinse and repeat in Step 2-4 for other Layers PS of PRO, if needed: Background, Scene Details, Environment, Animal, Blueprint, Weapon Frame & Shape
Color it in with color pencils or crayons; NO Paints allowed unless skilled
Like? Make Color Copy for keep. Scan and upload to drive or device's storage.
Computer - Paint App
Touchscreen computer, prep stylus or prep mouse drawing and know your automatic symbol create
Keep fingers on Ctrl + Z / Y after drawing with finger / stylus / mouse
Select and click to fill in color or use stylized drawing
Rinse and repeat 2 -3 until product's completed
Save and upload
** You need good skills for this. Only apply to a program called Paint already installed in your Window OS computer
** If other drawing program applications downloaded, please see other readers for more explanations
Phone/Device - Drawing App
- Sketch
- Select + Copy + Paste / Copy + Clipboard
- Tap to draw on new copy
- Rinse and repeat while adding details
- Delete a few copies to save storage and upload to drive

